
We study how to setup a simple firwall using Netfilter, the standard packet filtering tool in Linux. Netfilter allows for:
- Packet filtering
- Network address translation (NAT)
- Packet mangling
Netfilter can be configured through iptables, a very powerful and flexible tool.
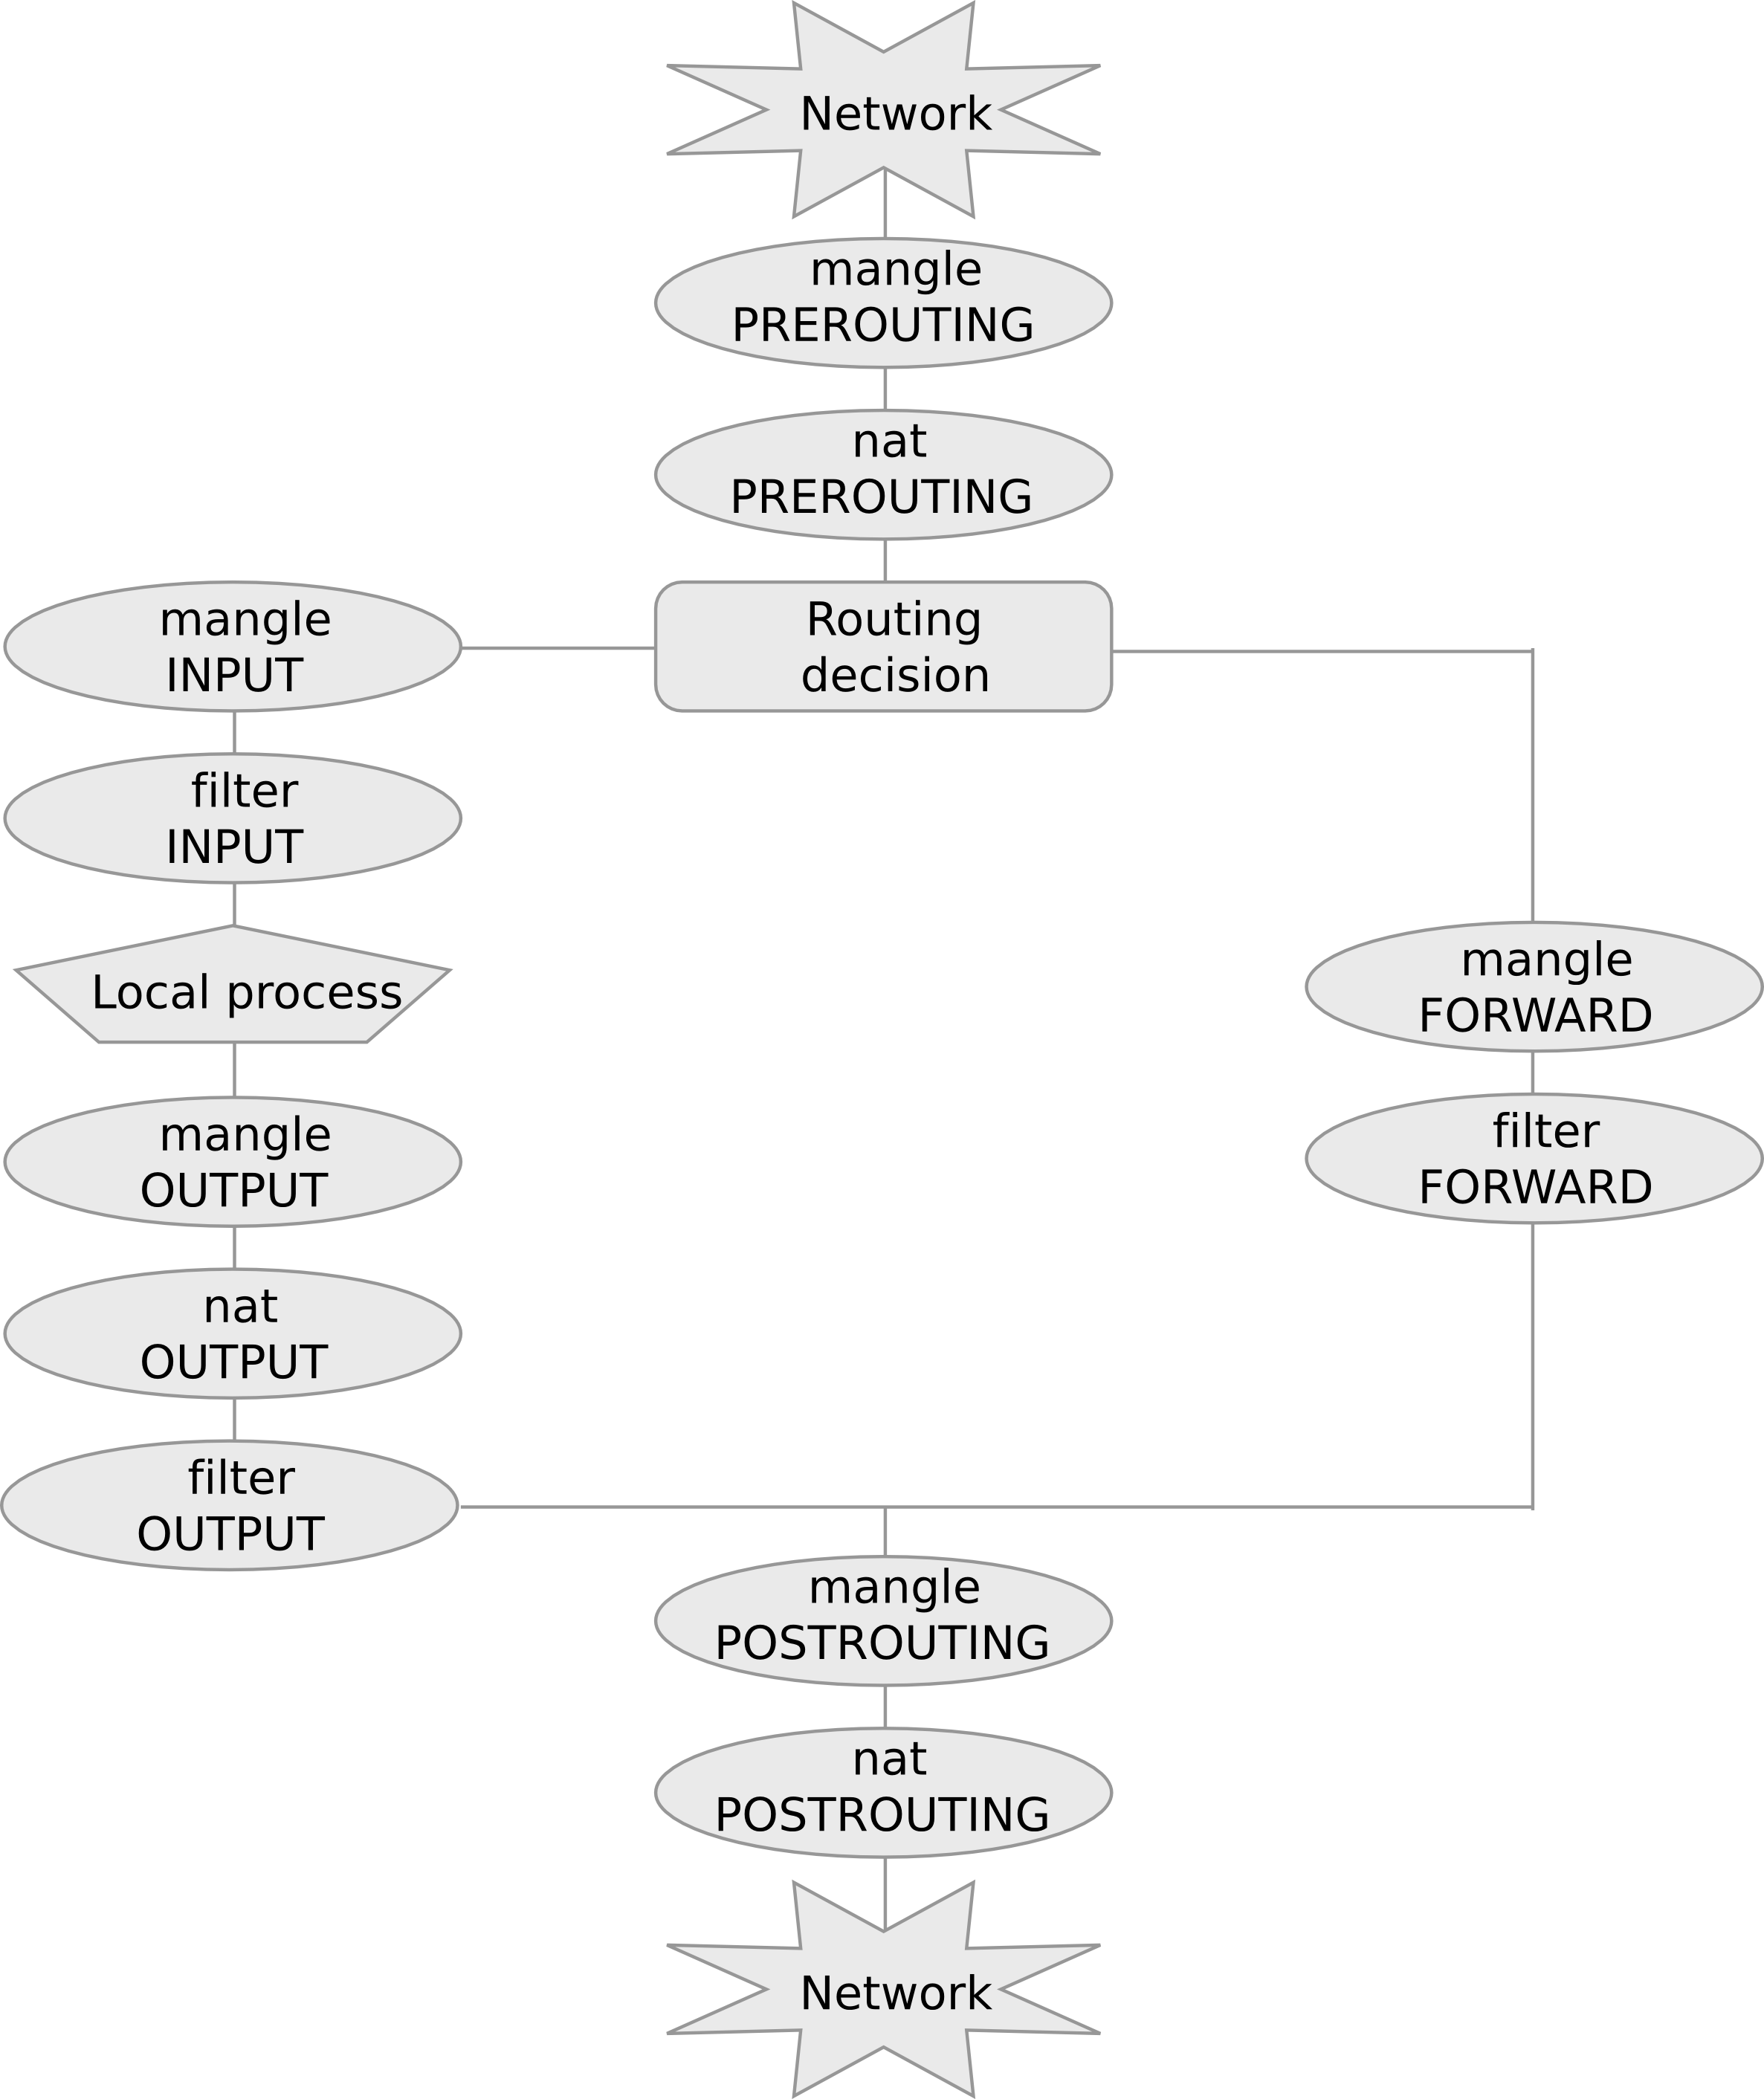
Tables and chains
netfilter is based on tables each containing lists of rules called chains. The three most commonly used tables are:
- mangle for packet alteration
- nat for NATs
- filter for packet filtering
Chains are lists of rules that are inspected one after the other. There are five predefined chains that are inspected in specific moments of a packet life cycle:
- PREROUTING, as soon as the packet reaches the host;
- FORWARD, when the packet is routed through the host;
- POSTROUTING, when the packet is about to leave the host;
- INPUT, when packets are routed to the host;
- OUTPUT, when packets are generated by the host.
The following diagram summarizes chain and table traversal:
As we stated above, chains are lists of rules that are inspected one after the other. Rules specify criteria to match a packet. If the packet matches the rule then it is processed as specified in the rule target. If instead the rule is not matched, the next rule in the chain is examined.
The most commonly used targets are:
- ACCEPT, for accepting the packet
- DROP, for dropping it
- DNAT, for destination NAT
- SNAT for source NAT
A default policy is triggered if none of the rules in the chain matches.
A simple firewall for incoming connections
In netfilter the default policy is ACCEPT. We can inspect chains and policies with the following command:
# iptables -t filter -L
Chain INPUT (policy ACCEPT)
target     prot opt source               destination

Chain FORWARD (policy ACCEPT)
target     prot opt source               destination

Chain OUTPUT (policy ACCEPT)
target     prot opt source               destination
Option -t specifies the table (filter is the default table so we could omit it in this case) and -L stands for “list”.
Keeping ssh port open
Now, if we are connected to the linux host remotely via ssh, before we try to change the default policy we need to add rules that will keep ssh port open, otherwise we will cut ourself out of the host. To this purpose, we add both in INPUT and OUTPUT the following rules with target ACCEPT:
# iptables -A INPUT  -p tcp --dport 22 -j ACCEPT
# iptables -A OUTPUT -p tcp --sport 22 -j ACCEPT
Option -A stands for append while -p tcp specifies tcp protocol. Then we have –dport and –sport to specify destination and source port, respectively. Finally -j ACCEPT specifies the ACCEPT target in both cases. The first rule means that any tcp packet delivered to the host (chain INPUT) with destination port 22 (ssh) will be accepted. The second one states that any tcp packet originating from the host (chain OUTPUT) with source port 22 (ssh) will also be accepted.
Let us check that the two rules have been added in the chains and are matched by current packets. It is enough to issue again a -L with option -v (verbose):
# iptables -L -v
Chain INPUT (policy ACCEPT 0 packets, 0 bytes)
 pkts bytes target     prot opt in     out     source               destination
   57  3844 ACCEPT     tcp  --  any    any     anywhere             anywhere             tcp dpt:ssh

Chain FORWARD (policy ACCEPT 0 packets, 0 bytes)
 pkts bytes target     prot opt in     out     source               destination

Chain OUTPUT (policy ACCEPT 0 packets, 0 bytes)
 pkts bytes target     prot opt in     out     source               destination
   25  2740 ACCEPT     tcp  --  any    any     anywhere             anywhere             tcp spt:ssh
Good, we can see the two rules and on the left the number of packets that have matched the rules so far (if we are connected via ssh this will grow up).
DROP Default Policy
We can now safely change the default policy of INPUT chain to DROP as follows:
# iptables -P INPUT DROP

# iptables -L -v
Chain INPUT (policy DROP 0 packets, 0 bytes)
 pkts bytes target     prot opt in     out     source               destination
  126  8632 ACCEPT     tcp  --  any    any     anywhere             anywhere             tcp dpt:ssh

Chain FORWARD (policy ACCEPT 0 packets, 0 bytes)
 pkts bytes target     prot opt in     out     source               destination

Chain OUTPUT (policy ACCEPT 0 packets, 0 bytes)
 pkts bytes target     prot opt in     out     source               destination
   63  8016 ACCEPT     tcp  --  any    any     anywhere             anywhere             tcp spt:ssh
Look at the policy for chain INPUT. It is now DROP. This means that the only packets that will go through are the ones directed to port 22! We can check this by pinging the host:
$ ping 10.0.11.1
PING 10.0.11.1 (10.0.11.1): 56 data bytes
Request timeout for icmp_seq 0
Request timeout for icmp_seq 1
Request timeout for icmp_seq 2
Request timeout for icmp_seq 3
Request timeout for icmp_seq 4
^C
--- 10.0.11.1 ping statistics ---
6 packets transmitted, 0 packets received, 100.0% packet loss
All packets are lost. Let us check that packets have been dropped by the policy:
# iptables -L -v
Chain INPUT (policy DROP 6 packets, 504 bytes)
 pkts bytes target     prot opt in     out     source               destination
  144  9760 ACCEPT     tcp  --  any    any     anywhere             anywhere             tcp dpt:ssh
...
Good, we have 6 packets dropped by the policy a 6 packets sent by ping. They have all been dropped by our DROP policy.
Policy can be set back to accept with:
# iptables -P INPUT ACCEPT
You can double-check that ping now works as expected.
You can always flush iptables with iptables -F. This will delete all the chains in the table so don’t execute it now! Notice that this does not change the default policy, so if you have a default DROP policy and you flush you will cut you off from the host!
Established connections
For OUTPUT we still have an ACCEPT policy, thus connection from the host are all enabled. However, notice that only outgoing packets will go through while any answer will be blocked by the INPUT DROP policy. There is a general way to enable all answers to already established connections:
# iptables -A INPUT -m state --state ESTABLISHED -j ACCEPT
# ping 10.0.11.1
PING 10.0.11.1 (10.0.11.1) 56(84) bytes of data.
64 bytes from 10.0.11.1: icmp_seq=1 ttl=63 time=0.847 ms
64 bytes from 10.0.11.1: icmp_seq=2 ttl=63 time=0.655 ms
64 bytes from 10.0.11.1: icmp_seq=3 ttl=63 time=0.621 ms
64 bytes from 10.0.11.1: icmp_seq=4 ttl=63 time=0.652 ms
64 bytes from 10.0.11.1: icmp_seq=5 ttl=63 time=0.645 ms
^C
--- 10.0.11.1 ping statistics ---
5 packets transmitted, 5 received, 0% packet loss, time 3998ms
rtt min/avg/max/mdev = 0.621/0.684/0.847/0.082 ms
# iptables -L -v
Chain INPUT (policy DROP 8 packets, 672 bytes)
 pkts bytes target     prot opt in     out     source               destination
  422 26552 ACCEPT     tcp  --  any    any     anywhere             anywhere             tcp dpt:ssh
    5   420 ACCEPT     all  --  any    any     anywhere             anywhere             state ESTABLISHED
...
So now we have that ping packets go out because of the ACCEPT policy in OUTPUT and answers go through thanks to the new rule using module (-m) state and accepting all ESTABLISHED packets, i.e., packets that belong to established connections. Notice that new connections to the host won’t be accepted by this rule.
It is possible to see the 5 accepted packets on the second ACCEPT rule in the INPUT chain corresponding to the 5 answers to ping requests above.
Netfilter Connection Tracking
Connection tracking keeps track of the established connections. If we run the command line utility conntrack while pinging another host we can see the following:
# conntrack -L | grep icmp
conntrack v1.4.2 (conntrack-tools): 5 flow entries have been shown.
icmp     1 29 src=10.0.20.1 dst=10.0.11.1 type=8 code=0 id=21809 src=10.0.11.1 dst=10.0.20.1 type=0 code=0 id=21809 mark=0 use=1
In particular we notice that connection tracking keeps track of the source and destination of the outgoing packets (src=10.0.20.1 dst=10.0.11.1) and the source and destination of the incoming ones (src=10.0.11.1 dst=10.0.20.1). This apparently redundant information is important when address translation is in place, since incoming packets might have difference addresses with respect to outgoing packets, as we will se in the next section.
Notice that conntrack command line utility is not installed by default in all Linux systems.
Network Address Translation (NAT)
Network Address Translation is an important feature of Netfilter which is useful in various situations:
- Accessing the Internet from an internal, private LAN (source NAT)
-
Redirecting requests to a certain port of a web server located in the internal LAN (destination NAT).
For example:# iptables -t nat -A PREROUTING -p tcp -i eth0 -d 192.168.0.1 --dport 80 -j DNAT --to-destination 192.168.0.100:80
redirects all traffic coming from interface eth0 with destination 192.168.0.1, port 80, to host 192.168.0.100 port 80. So the web server on host 100 will answer to web requests. Notice that answers from web server on host 100 are translated as coming from host 1, which is what the browser expects. So translation happens transparently for all established packets. NAT rules are inspected only when initiating new connections. Translations are stored and suitably applied to all packets belonging to the same connection.
Notice that for DNAT to work it is necessary that the host is configured so to forward packets that are directed to a different host. This is usually disabled by default. We can inspect this feature as follows:
# cat /proc/sys/net/ipv4/ip_forward
0
In order to enable it it is sufficient to put 1 as follows:
# echo 1 >  /proc/sys/net/ipv4/ip_forward
# cat /proc/sys/net/ipv4/ip_forward
1
Finally, DNAT alone works only if the host acts as a gateway for the final host. In fact, if the final host answers directly to the source host communication will fail (since addresses won’t match). In order to achieve NAT between any host is to use DNAT and SNAT together, as suggested in the following exercise.
Exercise 1
Configure a DNAT and a SNAT so to redirect all traffic directed to the firewall to another host, in a way that answers are correctly delivered to the client host. You can test the firewall configuration through a nc connection. Use `conntrack` to check NAT.
Exercise 2
Configure a firewall on your vulnerable host so that:
- the only open ports are 80 and 22 (be careful to open 22 before you set the policy to DROP)
- redirect incoming connections to port 80, to port 8000 on the same host. Run a python SimpleHTTPServer on 8000 to test the redirection (connect through the browser).
- direct connections to port 8000 are prevented: the web server should only be reachable through port 80.
Mignis
Mignis is a tool developed by our security group that simplifies firewall specification and makes it easy maintaining configurations. Discover more about Mignis here.